 There are certain technical skills that virtually all authors need to write a book and have it published. necessary for authors who want to publish a book. Competence in Microsoft Word, for example, is a minimum requirement. Today, I’d like to discuss the benefits of another professional writing tool, and make the case that any aspiring (or established) author will benefit from using it.
I’ve been writing in Scrivener since 2009. Back then, it was only available for Mac, which is a little unusual for productivity software. The developers did so because they wanted to build something with a user-friendly design that integrated well with OSX (the Mac operating system). Unlike Word for Mac, which is still rather clunky in my opinion, Scrivener was gorgeous.
Now, this tool is available for PC and Mac users alike, but the lovely interface isn’t the major selling point. Scrivener helps authors write faster, better, and with fewer distractions. Here are some of its best features.
1. Writing Organization and Planning
Let’s start by debunking one of the more common misconceptions about Scrivener, that it’s only for the “plotter” who outlines heavily before writing. Yes, Scrivener offers a lot of organizational features, such as:
- Scene, chapter, and section organization.
- A corkboard view for scenes with drag-and-drop reorganization
- Color highlighting, scene synopsis, and other features for the visually-minded.
- Folders for non-manuscript files, such as character profiles, maps, or images.
These features are helpful if you’re into planning and organization, but they’re optional. I was a discovery writer (A.K.A. “pantser”) for most of my career. I wrote scene-by-scene, from start to finish, without a lot of planning.

I was able to do this in Scrivener without using any of the fancy organizational features. I’d just create a new scene (essentially a text file), write it, and move on to the next.
The nice thing about drafting in Scrivener is that you can just write, and come back to use the organizational features during revision. Scenes can be moved with drag-and-drop, which seems far less error prone than cutting and pasting large swaths of text in Word. You can un-check a box to “cut” a scene from the compiled manuscript, without needing to delete the text. In summary, you can write by the seat of your pants in Scrivener, and its organizational tools might save you some time down the road.
2. Manuscript Compilation and File Import
Scrivener’s manuscript compilation and file conversion capabilities are incredible time-savers. You can compile anything you’ve written in it (e.g. Short story or novel) into standard manuscript format format. It’s a huge timesaver, because you don’t have to worry about headers, footers, spacing, or anything else. I pick the output format, modify if desired (e.g. I might want to override all fonts with Times New Roman), choose an output file format, and hit go. It can build DOC, DOCX, RTF, or PDF files this way.
Self-published authors will also appreciate Scrivener’s ability to output directly to native e-book formats for Kindle (MOBI), Nook (EPUB), or iBooks (author chapters). No separate conversion tool is necessary.
You can also import and “split” Microsoft Word documents into a Scrivener project. This lets you bring a project back to Scrivener after things like critique and copy edits, which generally have to be done in Word.
3. Name Generator Tool
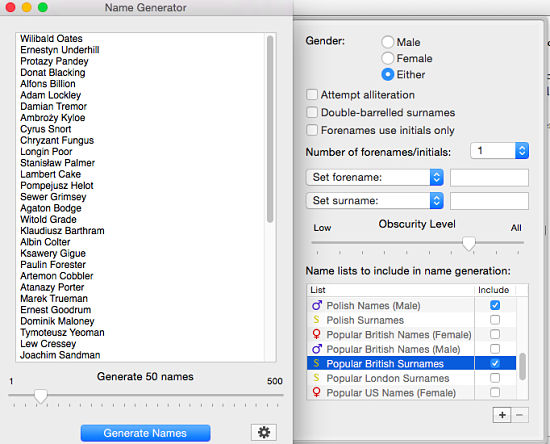
One of my favorite little-known features in Scrivener is the name generator, which is probably worth the cost of the software all on its own. You specify the gender (male/female/either), the obscurity level (from “John” to “Aldwin”), and source lists (e.g. German, Japanese, Polish, Spanish). It generates hundreds of names in less than a second.
Before I found this tool, I found character names by browsing a “Baby Names” book. That was incredibly time consuming. Now, I use the name generator tool, which saves my presets and runs within my writing software. I hope that the developers build in more features like this, because the name generator is phenomenal.
4. Automatic Synopsis Generation
If you get anywhere in the writing game, you’ll undoubtedly be asked to write synopses for your books. This is a task that’s widely reviled by a surprising majority of authors. So, how’s this for a selling point? Scrivener will automatically generate a synopsis for you. All you need to do is fill out the little synopsis field for each chapter/scene in your manuscript. This is done within Scrivener, using a little side panel that looks like an index card.
I often don’t stop to fill these out when I’m drafting, but if I go back through and summarize each scene in 1-2 sentences, that’s enough. When I go to Compile > Synopsis Outline, Scrivener generates a Word document with a chapter-by-chapter synopsis, based on the summary sentences I wrote for each scene.
5. Distraction-free Writing Productivity
 Some authors have no trouble making time to write and hitting their word counts every time. I don’t know any of them personally, but I’m sure they exist. Luckily, Scrivener has a few built-in features designed to help you get the words down on paper to meet your writing goals. One of those that’s fairly common now is a full-screen writing mode, which hides everything else on your computer’s cluttered desktop. If social media, chat, and other distractions tend to disrupt your writing time, this can be a powerful tool.
Word count targets are another productivity booster. You can set them by project or by writing session, and then watch as the green progress bars march toward the goal line.
Please Share This Article
I hope you’ll share the benefits of Scrivener with your writing friends. Please use one of the sharing buttons below, or click to send a ready-made tweet.
| Click to Tweet 5 reasons to write with Scrivener, by @DanKoboldt: http://dankoboldt.com/reasons-write-scrivener/ |
Follow me and you'll never miss a post:
Please share this article:


Great post! I just started using Scrivener and didn’t know about the name generator or word count goal! Now I’m excited to use them.
Can you tell us how to find the name generator?
I can on Mac! It’s under the Edit Menu > Writing Tools.
That worked for PC too, or close enough for me to find it. Thanks!
Yeeeeees! I love scrivener and am so stoked to learn that you do, too. Like you, I’m more of a discovery writer than a plotter. I completely agree that the program works great when it’s time to turn around and start revising. Name generator, awesome. Synopsis generation, clutch. But it’s the session target bars that I love the most, because that one feature all but guarantees I complete a draft. Thanks for spreading the word. Happy writing to you!
Don’t forget my number-one reason: scene snapshots! Before I’d have so many different Word files every time I started an edit (I used software numbering but getting down to like 4.5.3 got old… and duplicated a lot of stuff). Now whenever I sit down to do more than fix some typos, I snapshot the scene. Some of my scenes have only one or two, others have… more. Which means I’m always compiling to the most current version but I never have to lose any prose (and I have occasionally rescued prose from really old versions).